Thursday, December 30, 2010

Tobogganing

Ok, we don't really call it tobogganing in our house but I do love the use of that word. :) For the first time ever the younger kids got to sled with some family friends.

Isaac, confused by the sled, thought maybe it was Dillon's shield, so he was quick to launch snowballs at his buddy.
Evan Grace, not seeing the sled as a shield of any kind, was quick to get on and try out a short run on a small hill. Looks like she handled it pretty well.
Oh Mackenzie, all decked out in her cameo overalls for warmth. She's going to be uber ticked I posted this pic!!!
Katie and Isaac started off forward, but with just the right placement of her hand, the spun around and rode the rest of the way backwards.

Foxy (the family friend's dog) was excited to watch all the commotion.
Katie is such a daredevil. :)
I'm not sure what Dillon was trying here, but it looked like it could work really well or be disastrous on many levels.
Another backwards slide, this time with Evan Grace.

Of course no snow adventure would be complete without Isaac having a few bites....ok, more than a few....
...and Evan Grace making a snow angel.


With all our sledding, I mean tobogganing fun I'll leave you with one of the best pictures from the entire day. :) Or at least the funniest one.
Posted by Picasa

Friday, December 24, 2010

Thursday, December 23, 2010

Gift Card Envelope.

Gift cards, a quick and easy gift but unless you're going to put it in a Christmas card or something, it's not a pretty gift to give. If you measure you gift card from short side to short side and times that by 3 you have the length of fabric you can cut to make a gift card envelope out of fabric. You're going to cut out a rectangle so measure the long side of your gift card and use that for you bottom measurement. Mine was like 6'' by 15''. Cut two pieces this size.

Place them right side together and sew all four sides, leaving a few inches open for turning right side out.
Clip your corners for an easier way of making your corners neat when you do turn it right side out.
If you want to add a button, then on the outer piece of fabric, before you sew it right side together with the back piece of fabric add you button to one side and your button hole to the other end, make sure you place them both in the middle so they line up when you fold your envelope in.
Turn everything right side out and fold up the bottom seam a little more than half way up the rest of the fabric. This creates your pocket. Sew down the sides of your fold to create the pocket. I always back stitch a few times at the top of the pocket to make it a little tougher. If you line up your opening just right you can fold in the sides and when you go to stitch the sides of this fold into place you'll catch the opening you left for turning things right side out and you can sew this shut at the same time you sew your fold.


I didn't add a button, instead I cut a tiny strip of sticky Velcro and placed it on the underside of the envelope flap and the bottom of the envelope pocket.
There you have it, a cute fabric Gift Card Envelope. A cute way to dress up an otherwise ugly gift to give. :)
Here's a shot of it closed and ready to go. All I need to do is add a little tag.

Tuesday, December 21, 2010

Enormous Drawstring Bag.

Problem: How to wrap or where to find a bag big enough to place the handmade crock I got my Aunt for Christmas.

Solution: Sew up an Enormous Drawstring Bag out of leftover Christmas fabric from last year.

Here's how:
You need 2 pieces of fabric, one for the outside of the bag and one for the lining, or inside of the bag. I cut mine to 18x22''.

Since I was using this for a breakable crock I cut two pieces of medium weight fusible interfacing, measuring 18x18''. (Since this is going to be a drawstring bag I didn't find it necessary to cut the interfacing the same length as my outer fabric. Interfacing would make the drawstring part of the bag fold up too bulky.)

One string or rope, or yarn, or ribbon, or whatever you'd like to tie your bag with, cut 40'' long.

Now we're ready.

For the lining of the bag, with right sides together, sew along the two long sides and one short side. Turn right side out.
Apply interfacing to the wrong side of the outer fabric, line it up with the bottom edge of your fabric on one of the 18'' sides. Below is a picture of my outer fabric, wrong side facing up with the interfacing ironed on. Pin right sides together and sew along both long sides, MAKE SURE you DO NOT sew the edges of the outer fabric that is above the interfacing. I'll explain why in just a second.

Turn your outer bag right side out. Now for those edges we left unsewn. Fold in about 1/4'' of the outer edges and top stitch each side, DO NOT sew these sides together!!!! This is going to create the part of the drawstring bag, so you need the top of this outer fabric open.
Now fold down 1/4'' or a wee bit more along the top edge of your fabric and press in place. Pin and then sew.
 You should have two large pouches right now, one with interfacing (turned wrong side out), one just a fabric sack (turned right side out).

Here's the tricky part, it's just a little tricky so keep reading, you can do this no problem. With the outer fabric of your bag still turned inside out, stick it down into the lining fabric of your bag that's turned right side out. See the picture below? That's what you're after. (I hate I used the same fabric for the outside and inside, I think it makes it a little harder to picture this way, sorry about that.)

Line the top edge of your lining fabric to the top edge of the fusible interfacing.
Turn the top edge of the outer fabric down over the top edge of the lining fabric and interfacing. Pin everything in place. You're going to sew the lining fabric to the top of the interfacing at the same time finishing off the drawstring part of your bag in one nice sewn line. Make sense? I hope soooooo!!!!
All that's left is to thread your rope/string/ribbon thru the top edges of your bag all the way around and tie in a knot at the end. If you want you can add a second rope/string/ribbon for the other side, just start threading the second rope/string/ribbon thru the other end first. Viola an Enormous Drawstring Bag.


It fit the crock I got for my Aunt perfectly and it had enough padding inside that I didn't have to worry about it breaking while being handled and moved around.


http://todayscreativeblog.net/
http://www.thegypsyscorner.com/

Posted by Picasa

Monday, December 20, 2010

Zippered Camera Pouch

My sister and I got my mom a new digital camera for Christmas....,shhhh don't tell, and since camera's no longer come with any kind of camera case or pouch I decided to make her one.

Here's a small list of supplies you'll need if you want to make one of your own for your camera or anything really.
2-8x7 1/2'' of outer fabric
2- 8-7 1/2 of lining fabric, (I used muslin because it's soft)
1-8'' or longer zipper
Some form of embellishment for the outside of the pouch either store bought or made by you, or nothing at all if you prefer.

Though you can't see it in the picture but I ironed on some fusible interfacing to the outer pieces of fabric. The more padding for this camera pouch the better, especially if you're hard on your equipment like my mom is. :)

Aside from ironing all your fabric nice and flat, turn down about 1/4'' along the top of the outer fabric pieces. This will be the part you sew to the zipper.
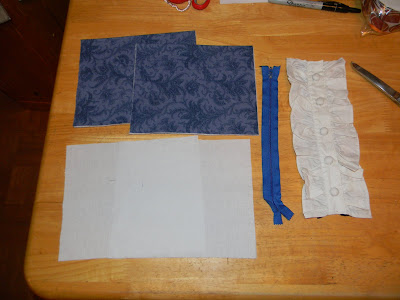
I was gifted a dress from a buddy, and honestly, I rarely wear dresses. Skirts yes, jeans yes, cargo pants yes, but a dress....rarely. I did however, like the buttoned ruffles up the front. I cut this from the original fabric to use for the front of this pouch.

Since my embellishment was sewn shut at the bottom and could unbutton I was able to sew a line down the outside row of buttons to attach this to the middle front of one of the outside pieces of fabric. Button it back up and you're ready to move on to the next step.

Attaching the zipper: The best method I've ever found for attaching a zipper into a pouch, or purse or any kind of project that has lining fabric is as follows: (I hope I can do this well enough for someone to follow!)

Lay your zipper face up. Take one piece of lining fabric and line it up with the bottom of your zipper. You can see the white lining fabric peeking out below the blue zipper.
Now take one of your outer piece of fabric, I use my front piece with the embellishment on it, and place it on top of the bottom of the zipper, as close to the teeth of the zipper as possible. It's almost like a zipper sandwich with the lining fabric on bottom and the outer fabric on top of the zipper. Pin in place and then sew.
Once you finished sewing, open the zipper and fold the lining piece under the zipper, this is what your pouch should look like so far.
Now you're going to do the same thing with the other side of the zipper, except keep the zipper open while pinning and sewing. Here's a pic of how it will look as you're lining it up and pinning it.
 Now, you've attached the zipper and this is what your pouch looks like so far. Looking nice right? And very close to finishing.
Close your zipper about half way and open your pouch so that the right sides of the outer fabric at lined up and the right sides of your lining fabric on are lined up. The zipper will be in the middle. I left the long edges of my embellishment so it would be easier to tell which side has the outer fabric.
Sew a line around all four outer edges, making sure to go over the zipper as well. Leave a 4'' opening for turning right side out. You can see where my sewing line breaks at the top left of the picture below.
 Turn everything right side up and either hand stitch or machine stitch the opening you left for turning everything out, closed. Take time to poke out the 4 corners of your pouch so you don't end up with a puffy, wonky corner. :)
If you make this pouch for your purse, or makeup or odds and ends you can take out the interfacing and it wont be so bulky.
Great! Now I have to pry this out of Evan Grace's fingers so I can give it to my mom.

mmm button

Posted by Picasa